Review: The Pixelstick is an Actual ‘Game-Changer’ Worthy of that Title
If you love light painting, then have I got a toy for you. The Pixelstick from Bitbanger Labs, which may just be one of the coolest ways to express your creative side after the sun sets.
The simplest way to describe the $350 Pixelstick is this: a 6-foot long narrow “stick” covered in LEDs that can be manipulated via the attached controller to “print” colors and images in the air and onto your camera.
Even simpler? It’s an absolute must-buy for any serious photographer.

It’s rarely meant to be taken literally when people throw around the old “the possibilities are endless” cliché, but with the Pixelstick, I think the possibilities might actually be endless.
Specifications
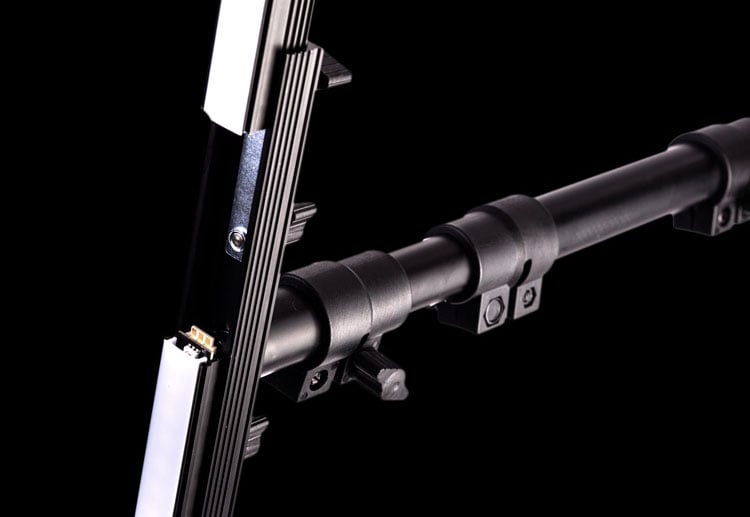
The Pixelstick’s 73-inch (6ft, 187cm) tall, all matte black, anodized aluminum body holds 200 RGB LEDs which can produce over 16 million colors, each individually addressable.
![]()
Tall though it may be, it is easily assembled and quickly collapsible—it splits in two—and can be stored away neatly in the included padded carrying case (which is, itself, lined with a yellow interior to make nighttime shoots a little easier when setting up).
The whole thing weighs just 4lbs, meaning it’s an easy carry to remote locations or over your shoulder as you walk throughout the city making abstract art—art that can be launched via the back-lit, easy-to-use control module mounted directly to the frame of the Pixelstick.
The controller is powered by 8 AA batteries (also mounted to the frame), and includes an SD slot through which you’ll load your designs and images onto the Pixelstick to paint them in the air.
The Pixelstick itself can be held with the removable spinning handle that enables full 360° rotations.
And that’s about it for the core specs, let’s dive into the review.
The Stick of Pixels: Build Quality
The first thing that I always evaluate when I tackle a product like this—especially one with no real competition—is build quality.

Being first to market, the first model produced by Bitbanger Labs, I hoped this wouldn’t be a “yeah it’s great but it broke in one week” sort of product. Fortunately, that doesn’t seem to be the case.
Everything about the Pixelstick feels well done and quite thought-out. Were there a few minor annoyances? Sure. But nothing that makes me think the Pixelstick isn’t worth every penny of the $350 asking price.
The aluminum frame of the Pixelstick is very sturdy, and I don’t foresee anyone having general build issues with it down the road. This is a hard prediction to make, I know, but there’s probably enough strength and, maybe more importantly, just enough flex in the frame to allow leeway for when that dreaded drop or other accident inevitably happens.
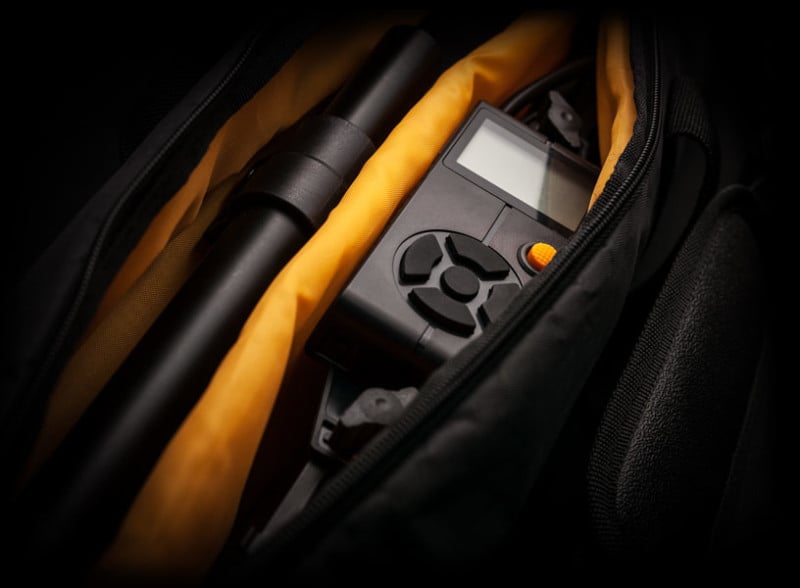
Thankfully, the Pixelstick doesn’t do anything proprietary, fancy, or backward for a power supply. Powering each of the 200 LEDs are 8 AA’s in a holder that needs to be (at least mine did) forcefully squeezed into the hard cloth compartment mounted to the frame of the pixel stick.
![]()
This battery compartment needs a better solution, plain and simple. It may be fine when it’s 80° outside, but a few of the nights we went out to test the Pixelstick were at or near freezing, making a battery change a very, very painful experience for my poor hands.
When you consider the notion that the Pixelstick will be primarily used in the dark, it would have been nice to see at least one or two white, flashlight LEDs embedded on the rear of the metal frame, switched on independently of the front LEDs.
Too many times during my tests did one of the little black screws come loose and fall to the ground, nearly lost to me forever. It would have been nice to be able to quickly flick on a bright light on the stick itself, rather than have dig out my iPhone or carry an actual flashlight around.
The handle mounts firmly and nothing felt loose as I waved it about, somewhat violently at times, running back and forth through the frame. It’s here that the lightness of the Pixelstick shines, because not once in all the times I used it—even one night making attempt, after attempt… after attempt—did my arms begin to fatigue.
I would, however, suggest that the handle is a bit lacking in design thought as an aid in making creative photos. Yes, the spinning sleeve is pretty cool, but it will remain locked if you’re printing images. Whereas, when you’re printing images, a longer, even angled arm would’ve come in handy.
Light painters tend to be a pretty good DIY group, so I feel most will solve this problem themselves, but it would have been nice to see a 90° angle pole attachment included.
Still, despite the very few criticisms I have, the Pixelstick is a solid and well-built product.
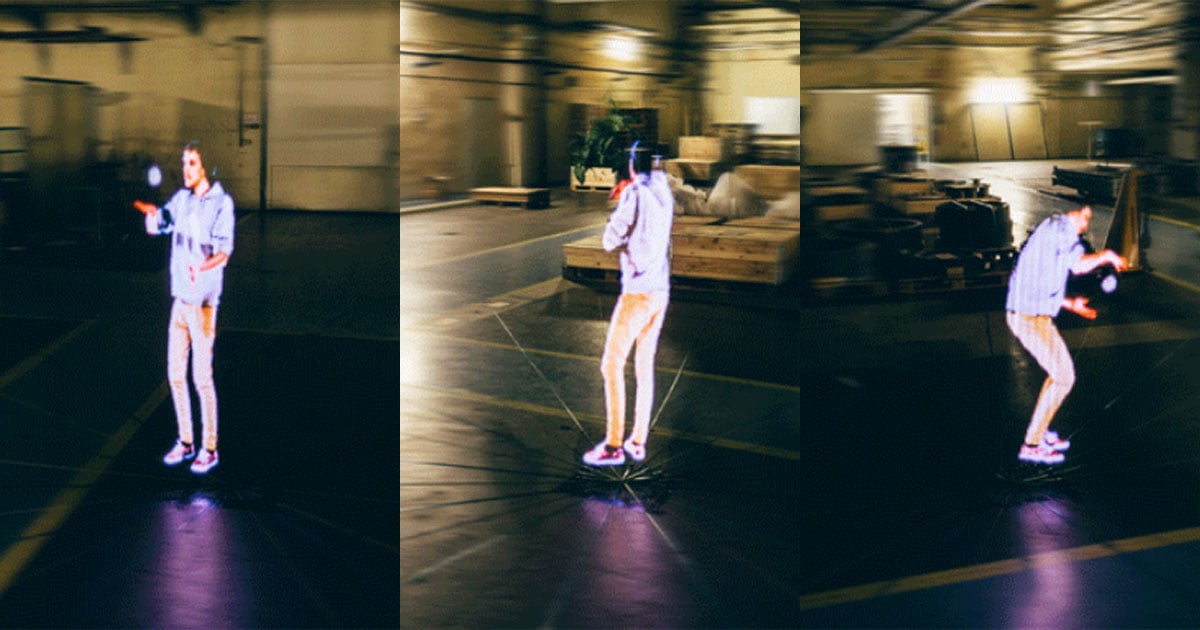
How To Prepare
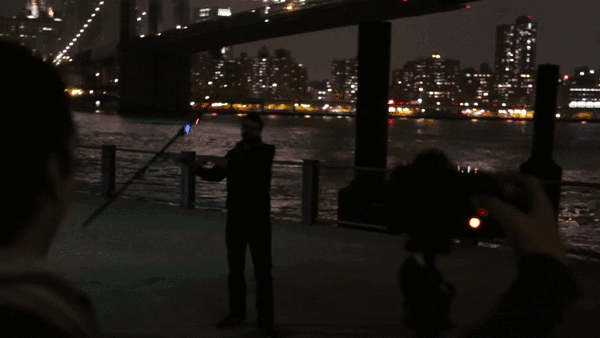
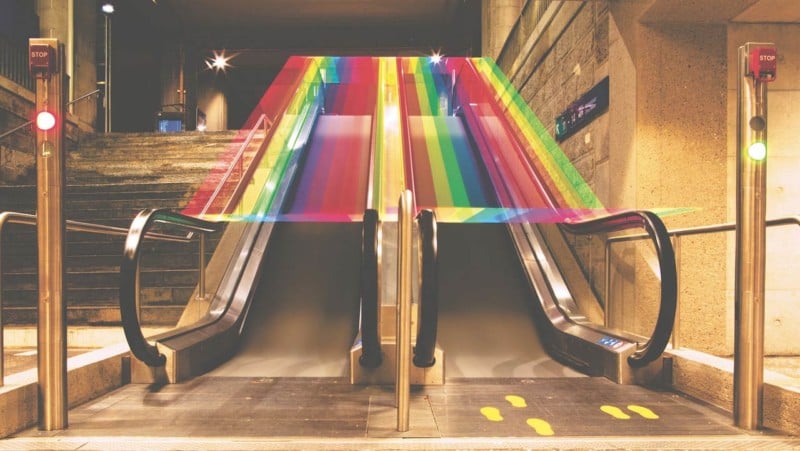
The basis of how the Pixelstick operates is actually kind of simple. After setting your camera to a long shutter speed—something above 2 seconds works best—you load an image through the controller of the Pixelstick. Then, as you walk through the frame of your camera, the Pixelstick’s LEDs fire on and off, creating vertical lines of color that combine to reproduce the image you selected.
![]()
You can adjust several different options directly on the Pixelstick’s very clear and easy-to-use controller to help reproduce the chosen image properly within your composition, including: brightness, speed, orientation, direction, countdown timer, white balance, and a few other more advanced options.
The controller’s power toggle is a mechanical rocker switch which sits atop the remote, making it easy to find in the dark. You trigger your art and lights using the conveniently orange-colored “Fire” button placed near the LCD screen.

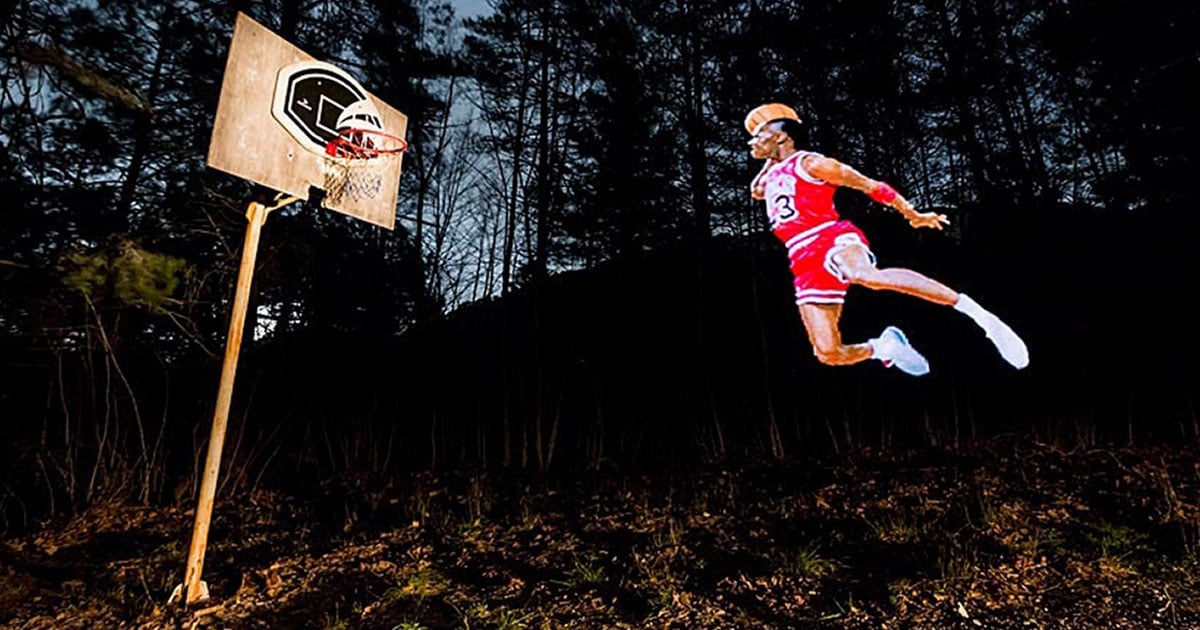
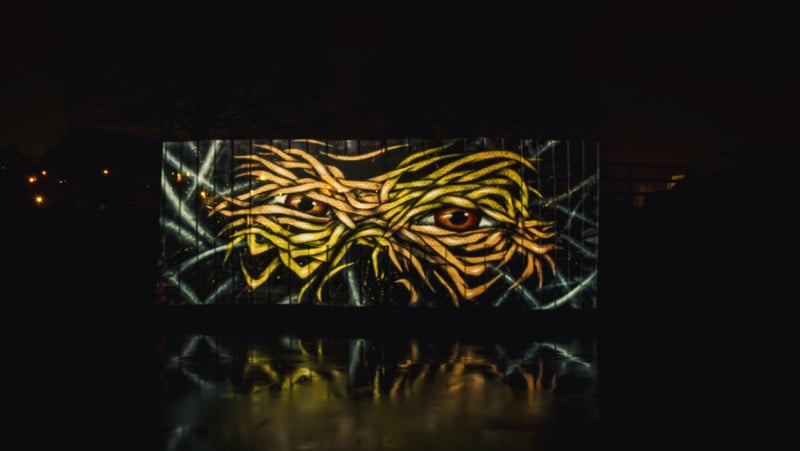
Looking at the examples on the Pixelstick website, you can clearly see the massive potential for this product. When Saturday Night Live and James Cordon’s Late Late Show are making use of the product in their intro and bumpers, you know there’s something special there.
![]()
Images like the “Saturday Night Live” bumper are first created in a tool like Adobe Photoshop or using the handy tool directly on the Pixelstick website here.
Though the images are simple, a little work must be done to prep them. First and foremost, it can be max 200px high, but width doesn’t matter. Secondly, keep in mind that black areas will not show up in your light painting. Finally, your image needs to be rotated 90° counter clockwise, so that the left side of your image is on the bottom.
And that’s it. Export as a 24-bit .bmp file, drop it onto an SD card, and load that onto the Pixelstick controller. Job done. Pretty easy, right?
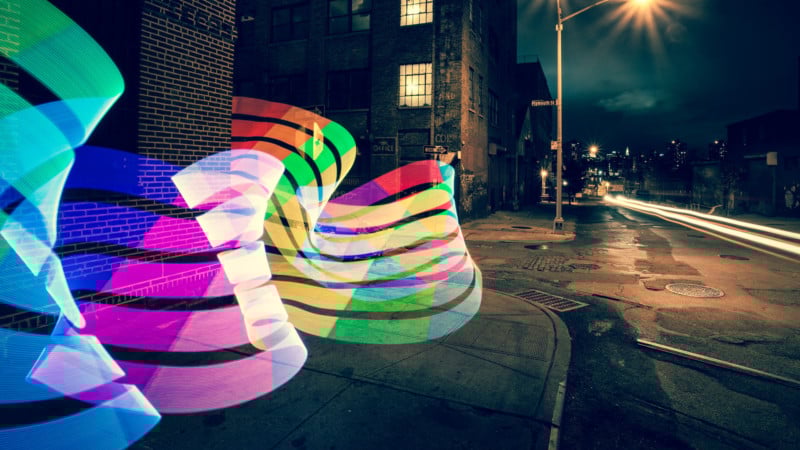
What You Get

Simple though it may look, it isn’t all gravy… especially if you’re attempting more complicated photographs or long exposure sequences that you’ll later turn into animated gifs or video.
The learning curve of actually producing images in the night sky is steep, even if you consider yourself a seasoned veteran in the realm of light painting.
![]()
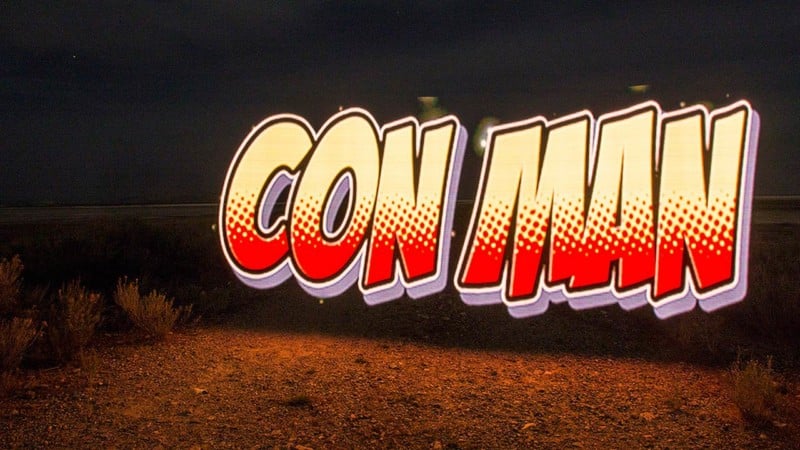
My suggestion for people who are new to the Pixelstick, or even light painting in general, is to start small and practice in situations that don’t matter before breaking it out in front of clients.
The Pixelstick website offers this solid tip: work with a basic checkerboard pattern first to get your timing down. Once your squares are all 1:1 ratio and not stretched rectangles, you know you’ve gotten the hang of it.
![]()
Also remember that the Pixelstick can adjust the brightness to balance against your ambient lighting to suit your needs.
When it works, I’ve no doubt your clients will be thrilled with the originality you’ve produced for them. If you’re a wedding photographer, this needs to be in your tool box.
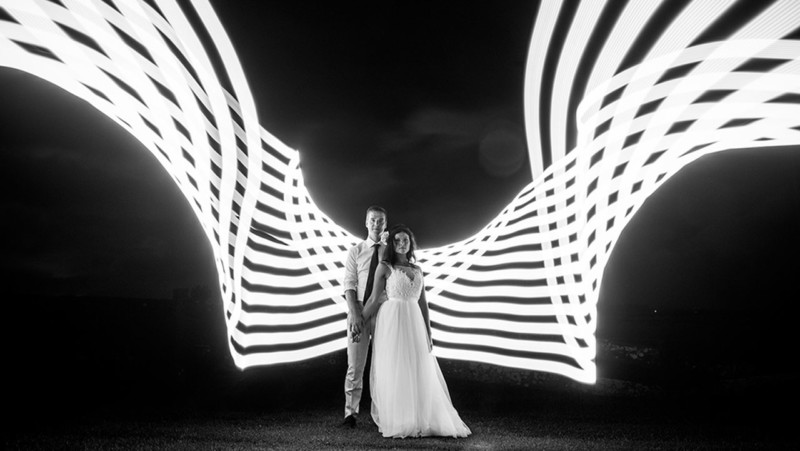
I’m sure a few traditionalists out there are scoffing at this idea right now. But even if it’s a simple shot—like their names and wedding date painted above their heads or just the word “LOVE” in big bold letters, wrapping around them—at some point in time throughout a wedding season you’re going to have clients who will absolutely love results like this.
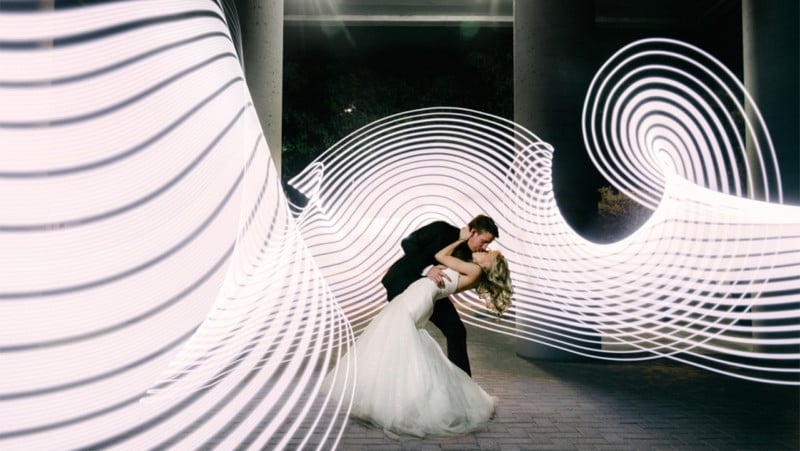
Thinking outside the box for a second, I can imagine photogs shooting a picture of the entire bridal party, loading it onto the Pixelstick, and then shooting another picture of the bridal party along side their light-painted selves.
![]()
Or think about all those pictures of bridal parties running away from dinosaurs. Now imagine, instead of Photoshopping that in after the fact, shooting it at night and light-painting it in with the Pixelstick. You would end up with light playing off your subjects, and save you time and effort in front of the computer later. It’s just wonderful.
Take a look at some of these samples from Bitbanger Labs themselves:

Conclusion
Whether you’re a serious professional, a dabbling hobbyist, or just a parent taking pictures of your newborn, the Pixelstick is going to be a fun and potentially game-changing tool for a lot of people who would otherwise never dabble in the DIY genre of light painting photography.
Yeah, there’s the phrase we all known and love, “game changing”. Probably the most overused hyperbole in all of the photography industry. These days just about anything that is slightly different from any previous product is considered game changing, but rarely is anything truly going to change the game.
And that’s exactly what I thought till I got my hands on the Pixelstick.
The Pixelstick prompted memories of the first time I shot with a fisheye lens… Every single picture I made with it was “the coolest, most awesome picture I’d ever taken to date.” Soon, I realized it was a very potent tool meant to be used sparingly and only when it was really needed, instead of a crutch to rescue an otherwise boring photographic opportunity.
The Pixelstick is like that, even if only a little bit. It’s an incredibly powerful appliance that can, when called upon and used properly, transform so-so pictures into “Wow!” moments.
And it’s going to do that for a lot of people who otherwise wouldn’t have been able to do so. Because yes, while you could make something like this by soldering wires to an Arduino board, a lot of people do not have the time or skill for that kind of DIY project.
Bitbanger Labs have done a lot right with the Pixelstick and very little wrong. From the the incredibly easy to use light controller to the overall professional level of build quality, the whole kit is a simple but impressively powerful tool that is suddenly available to the masses.