How I Planned and Shot a Photo of a Lake in the Swiss Alps
Sometimes, when you show an image to somebody, you hear, “Oh man!… How lucky you were to catch that light there!.” And yes, there is always a bit of “luck,” but there are also a lot of small details that help you to be better prepared for a photo.
First step: Build the idea
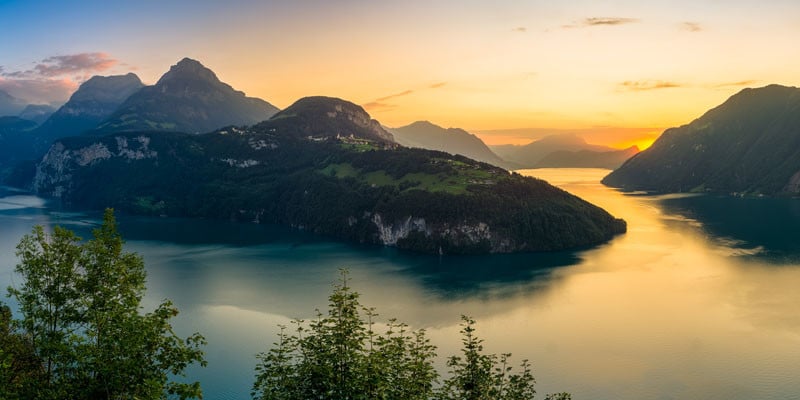
There’s an awesome lake in the Swiss Alps called “Vierwaldstättersee” (or Lake Lucerne in English, but the name in German is translated as “Four Forested-Cantons Lake”). For me, this is one of the most beautiful lakes in the Alps. It has a strange “S” form and it’s surrounded by lovely mountains, breathtaking cliffs, some towns, and even the big city of Lucerne.
So, the idea was to capture the lovely golden light of the sunset in its crystal blue waters. Sounds pretty easy up to this point, right? But I wanted to show both colors: the blue color of the water and also the golden color of the sun reflected in the surface.
Second step: Location scout
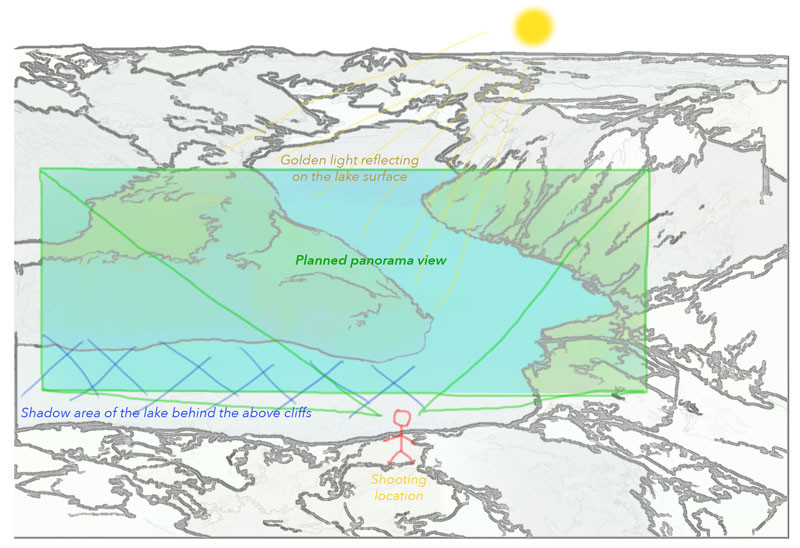
To achieve my idea I would need to take advantage of the curves of the lake and the mountains around. The sun, almost at sunset, will illuminate the lake surface creating the golden color that I want… and the mountains will block that light and they will cast a shadow that will let me see the real blue color of the water. So far, so good.
I needed to find a place with a nice view, high enough to get a good perspective. But not too high to get the sun in my face at sunrise or sunset, and during the correct time of the year, too!
What could be better than looking for a nice spot from the sky, right? Too bad that renting a plane is too expensive… but… there are lovely and cheaper ways to “fly”. A flight simulator is a good choice to fly around the lake and look for nice perspectives from different locations. So let’s take off!
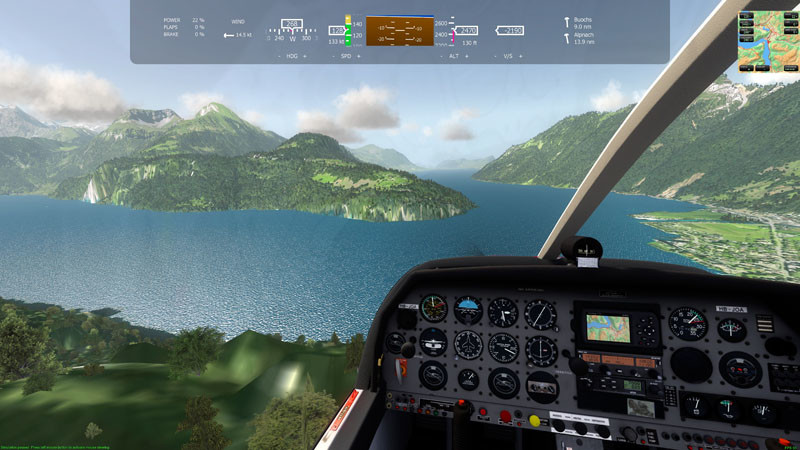
I was playing flying working with this flight simulator and found this nice view pointing directly to the west. So sunset will be my time… great! Looking to the opposite direction to catch sunrise light wasn’t as nice of a view as it is in this direction, and it also has no lowlands to see the sun really down because there were a lot of mountains there.
Ok… I’ve got a nice spot with a nice view looking to the west. Now… when should I go?
For this, I used an app that tells me the exact sun position for a specific date and time for that specific location.
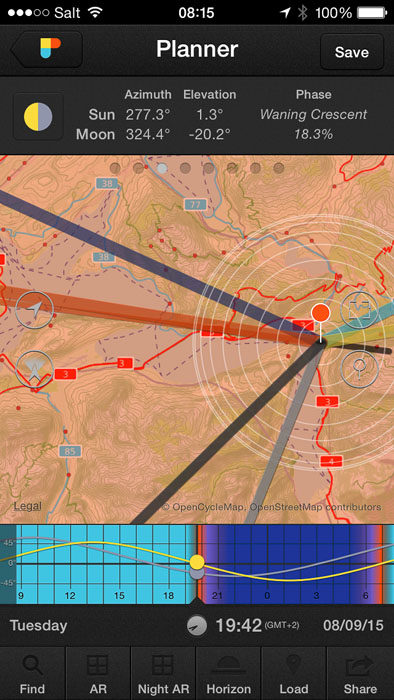
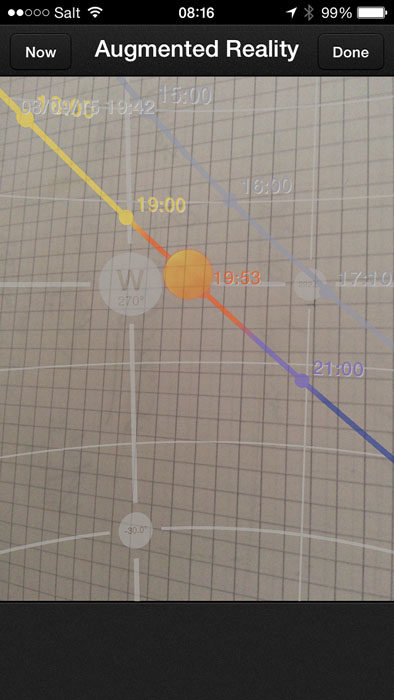
The app told me that on Tuesday 8/9/15 at 19:42, the sun will be in a position that will fill some part of the lake and that it is setting between the big two mountain peaks, allowing me to get the light almost at sunset without any mountains blocking it in the center of the lake.
Fifteen minutes earlier and the sun will be too high and in front of my face, and fifteen minutes later the sun will be below the horizon.
Ok. So now I’ve got the time. But why on September 8th? Because that was to be a sunny day (yes, I checked several weather forecasts, prediction models, webcams, satellite images, etc.) and also because that is the time of the year when I get that azimuth and elevation of the sun that I wanted.
For example, in June the sunset will be more in the north so I’ll get this same light, but only on the western part of the lake when I need the light filling the complete leg of the lake. In November on the other hand, the sunset will be more south so the sun will be blocked by the mountain on the west of the lake.
Kind of confusing? In fewer words, the time frame to catch the sun and its light in the position that I need to create the image that I want is actually really short. We are talking about a span of just a few weeks. In addition to that, you need a good sunny day during these weeks or you’ll lose your shot until next year.
Don’t laugh too loud, but this is a sketch of the idea…
So, the time to get that image will be on Tuesday 8/9/15 at 19:42 hours. I need to be ready there at that exact time. Let’s prepare the camera backpack.
Third step: Let’s take that picture!
Ok, so I’m at that location, one hour early of the “target time”, camera ready, best possible spot free of trees… let the show start!
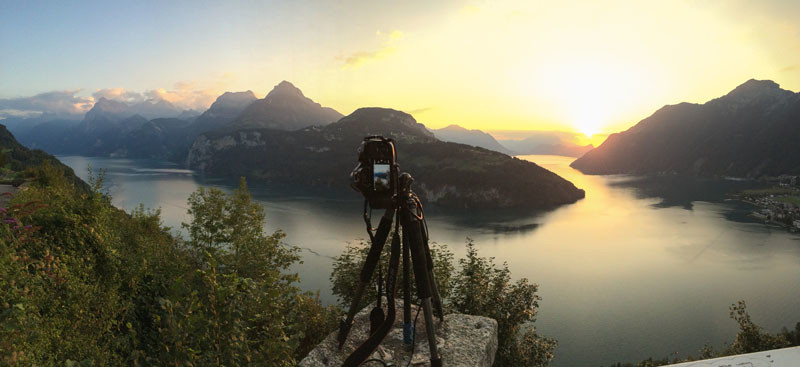
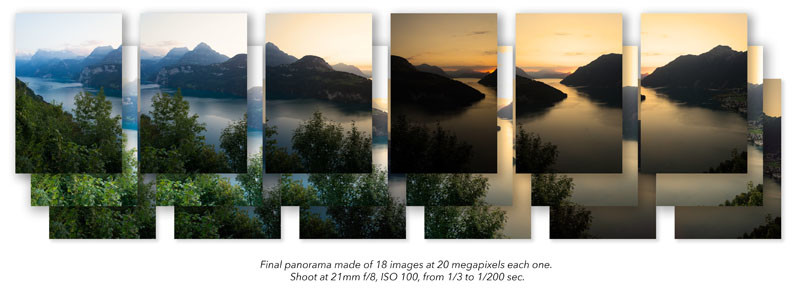
This is a really wide shot, so there is no way to make a great shot with a “super-mega” wide lens without a big distortion, and also I wanted to make a big image to be able to be printed in big sizes. So I decided to set the camera in portrait orientation, shooting at 21mm and f/8 ISO 100 to get the sharpest image. Of course, I will manually pan the camera in the tripod to make 6 images to stitch together later.
With this setup I’ll be able to get the composition that I wanted. But how do I capture all this light tones, from the extreme light of the sun to the dark shadows of the foreground cliffs as a normal human eye would see it? Bracketing images. That’s the only way to capture all that light tones.
So I set up bracketing mode in the camera to get exposures from approximately +-2 stops of difference. These combination will give me 18 images (6 vertical shots of 3 images each), and with that I’ll be able to make the final image in post production.
Fourth step: Build the final image
Finally! Now I “only” need to stitch all these files together in one big image. It’s a pretty complicated and technical process, but in a few words, I used professional software applications to stitch the images together and bring up all the details and colors of the final image.
So, “lucky”? Yes… for sure I was a bit lucky. But preparation is everything and without that, you will need a much bigger dose of luck to capture this kind of image.
P.S. I’ve made this photo available for purchase as a print through my online shop if you’d like to brighten the mood of your home or office.
About the author: Freddy Enguix is a landscape, tourism, and fine art photographer based in Switzerland. You can find more of his work on his website, Twitter, Instagram, Facebook, 500px, and Flickr.