
Focal blending: is this a technique you use, or is it one that you consider cheating?
It's a big question and one that is certainly up for debate, as it doesn't really capture the true scene, or does it? I honestly don't plan to try to sell you the idea that it is a perfectly ok thing to do, to change the perceived perspective of the location by utilizing the tools that you have at hand, your camera, and to provide an unreal perspective of the view you have in front of you. I'm simply going to provide you with the idea that you can do it, in some scenarios, to provide the viewer with a better idea of perhaps how you visualized the scene.
How often this is actually done, I'm honestly not sure, but at least knowing the technique, if you don't already, is another string to your bow, and that way, you can choose carefully when you decide to use it. I honestly hardly ever use it, but I do use it if I feel that due to the composition, my main focus is lessened slightly, as is the case with the images below.
Visualizing the Blend
The techniques involved are fairly simple in their approach, and it's down to the individual photographer to choose when shooting where the post blend line will be. In the tutorial example below, I've chosen to use the water as the blend line, as it played no major part in this composition and lends itself to the void between foreground, middle distance, and the castle itself. Just a little note here, these images were intentionally photographed for the tutorial to show how to achieve it, in case you were wondering why I didn't just move and get a better composition.
The blend lines are best done in areas where the viewer will not notice too much, if at all. These areas could be clear horizon lines, grassy areas (preferably in the mid-to-distant ground), rocks, sand, or areas where the effect you are trying to achieve can be done so in such a manner that it doesn't require too much work and is indistinguishable.
For example, in the black and white image below, the blend line is the foreground grass, so think about the time involved in doing that: masking it out and painting around nearly every blade of grass. Is it worth it? To be honest, with this one, it was a yes, as the time spent doing it allowed me to realize that I didn't want to do it again.

Zoom: Does That Make a difference?
The answer to that is an undeniable yes! This goes back to the first question: does this capture the true scene? But it also has other connotations. Shoot a scene, for example, at 70mm, and then, the mountains in the background at 200mm, and blend them together. The foreground will be as sharp as the distant mountains, and that doesn't happen, due to the atmospheric haze and the elements, plus the contrast for distant objects is clearly not as much as it is for the foreground elements. Also, another big one for this is the blending of the scene. Shooting at such a different focal length will almost certainly omit part of the landscape you are trying to capture and not relay the scene entirely as you saw it.
So, why not just select the area you want to enlarge and do that? You most certainly can, and it works. Photographers do it using blend and warp techniques, and the results are almost indistinguishable from the original. Well, to the viewer's eye. This technique is from a personal preference point of view, and I've also found in some instances it's handy to know when shooting.
Okay, so now that I've hopefully explained a couple of considerations to make, I'll get on with the technique.
The Technique in Camera
Although the final image is comprised of three images with different focus points, these being the rocks in the foreground, the middle rocks, and then the castle, plus an extra of the castle at the same focal distance as the other two, I shot the extra one of the castle as a safety image for blending. My main idea for this image was to bring the castle more to the focus of the viewer's eye.
The foreground and mid-ground images were shot at 21mm, allowing me to focus stack them in Photoshop. The distant castle was shot at 30mm. This, for me, was an acceptable change in the focal distance without compromising what I envisioned as the final shot.

 The final edit and shot above, I think provides a believable image and rendering of the scene that I saw, and the focal length shot of the castle at 30mm lends itself to the composition. The blend for this image, as you can probably guess, is through the water, where the viewer's eyes shouldn't be drawn to. Again, the same technique and choice of blend have been used in the long exposure image below, the focal length of 20.5mm for the foreground and 30mm again for the castle. We have gray days here in Scotland — quite a lot, in fact.

The Editing Process
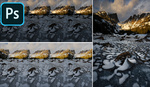
The editing process is fairly similar to that of focus stacking in Photoshop, where you take the images you want to blend together from Lightroom, in my case, and include the zoomed image, and open them as layers in Photoshop.
From here, put them into a group and then copy the entire group. The first group acts as a safety and blending group should any anomalies arise.

From here, I normally just turn off the visibility of the first group and open up the second group so that I can begin the automated process of auto-aligning and auto-blending the 21mm focal length exposures together. Remember, at this point, to turn off the layer visibility of the 30mm focal length before starting auto-align and auto-blend.


Once the auto-aligning and auto-blending process are complete, it's time to turn back on the layer visibility of the 30mm focal length and begin to match up, in this case, the horizon lines.
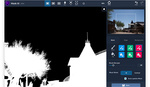
Choose the layer blending mode Difference, as this will allow you to see everything that is going on with your image layers. I would do this for all instances of this technique instead of dropping the opacity of the layer, as the difference mode, being of higher contrast visually, allows you to work more quickly.

From here, use the arrow keys of your keyboard to match as best you can the horizon line. Once this is complete and you are fairly happy with the results, turn the layer of blending mode from difference back to the normal mode. Now, it's time to blend them together.
First, create a layer mask for the 30mm focal length layer, and then, using the brush tool with the foreground color set to black, paint out the foreground areas of the image to reveal only the, in this case, the 30mm shot. If you are wondering why I didn't just use a gradient blend, it's because I wanted to match the size of the waves by eye and not rely on a gradient. Doing that may have left anomalies. For myself, the brush tool is one I use most of the time when blending, as I feel it produces better and more controllable results.
In the image below, I've indicated my blend line for this image. Although it's not an entirely straight line on the mask due to different wave sizes I hope you get the idea, as you need to make the blend almost invisible to the eye.

The final edit and the line you see near the rocks in the mid-ground is not the blend line, it's naturally occurring in the water.
Conclusion
I hope you found this tutorial helpful in some form. Whether that's a case of you never thought of doing that or nope, that's something I wouldn't even consider. For myself, I just used the focal length of the camera's lens to create an image that, to me, provides a better representation of the scene I was looking at.
I'd love to hear your thoughts on whether you use this technique or not.


The question is do you publish composite photos or not. This is just a type of composite. If you do it then you should be honest about it IMO and not try to sell it as a photo.
That is very true. How a person sees an image may differ from the output from the camera, taking f stop and other exposure values into consideration. And you are absolutely correct in saying that if you publish it, to be sure and state the process used in its creation. For personal use it doesn't make any difference. Personally, I try to make images come out either how I see them or try to get the final image of what I'm after in-camera. I don't think I would ever use this method.
This isn't entirely true. Many times our cameras do a poor job representing the scene in front of us, specifically when it comes to focal distortion. When shooting wide, as you may already know objects in the outer frame tend to look tiny. This method can compensate and fix that to give a better and more accurate representation of a scene than without it. I think being up front about an edit is important but to say you can't sell it as a photo isn't true at all.
You are right on the money. This technique, whilst superficially controversial, actually emulates an aspect of how we see. It is called Size Constancy Scaling (R. L. Gregory, Eye and Brain). This has the effect of making things appear closer than geometrically correct perspective should indicate. It is most effective with objects whose size is very familiar (human figures) and distant large objects like mountains and, in this case, a castle.
It's photographic perspective that is the illusion, not your vision! Check this out: https://psych.hanover.edu/krantz/sizeconstancy/index.html
It is entirely true. Do you not understand the definition of composite? Rationalization to make you feel better about it doesn't change definitions. "Definition of composite photograph
: a photograph made by combining several distinct photographs either made one over another on the same plate or made on one print from a number of negatives" This is obviously an old definition but the intent is clear.
It is quite easy to say it is a composite created to represent what you saw at the scene.
So why couldn't you sell it as a photo? I'm confused
A photo is a single image, not a composite. Ansel Adams adjusted all kinds of stuff but he didn't create composites. You CAN sell it as a photo. IMO that is dishonest if you derived it from more than 1 photo.
I never have any luck with auto blending layers and just do it manually myself. I'd be cautious only recommending that!
I've had a few like that as well Alex, hence the backup group as I can use those images to clear up the anomalies. Although I am finding photoshop is getting better at auto blending compared to a few years back. Helicon Focus I did really like though but never followed it through, unfortunately.
"Focal blending: is this a technique you use, or is it one that you consider cheating?"
I don't know about anyone else's vision. But, when I look at a scene, things "appear" in focus from front to back. No part of the scene is out of focus. That's probably due to our eye's superior lenses and/or our brains filling in the gaps. But, that's what I see and what I'm trying to capture. Since I would see exactly this front to back sharpness, having my images provide the same viewpoint, it's not cheating. I'm merely overcoming my camera's limitations.
Dunure castle 👍🏻