
The most important tool in any photographer’s arsenal is their ability to use and manipulate light. However all too often many photographers either shy away from, or completely rule out using hard light and it may be hindering not only their flexibility but also their creativity. What if you could shoot in direct sunlight and love it?
I’ve been all over in photography forums, and if there’s one thing I hear from people who prefer to shoot in natural light, it’s that they’re frustrated at being chained to the whims of mother nature. If the sky is not playing nice, or a client can’t book their shoot during golden hour, or the wedding ceremony takes place at three in the afternoon in August, they struggle to make photographs they’re happy with.
In this article, I’m going to talk about shooting portraits in hard, directional light and still getting images you can fall in love with. I’ll avoid the old standby of finding open shade, since it’s a simple solution that isn’t always available, and focus instead on a few ways you can use hard, directional sunlight purposefully in your images.
1. Key Light With the Sun
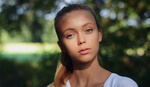
Hard light isn’t always unflattering, especially when you’re doing it on purpose and paying attention to the light shape on your subject’s face. If you use the sun as a key light, you’ve got to position yourself and your subject in such a way that you create a recognizable, flattering light pattern. Since not all faces are going to be flattered by the same light shape, you’ll have to purposefully pose your subject so that the light hits them just so. For women, the sun can give you light incredibly like the hard, directional beauty light of Old Hollywood portraits.

For men, the hard light can be very flattering and highlight the angular planes of a masculine face.


One trick you can use to enhance this technique is to find a background that is darker than your subject, or in shadow, so that your subject becomes the point of highest contrast, and you don’t have blown highlights in the background competing for the viewer’s eye. You don’t have to be afraid of shadows with this technique, just be purposeful about where you place them.

Remember that hard, directional light will show more skin texture, and be prepared to carefully pose your subject.
Pro tip: If you’re going to use the sun as your key light, it can be hard on your subject’s eyes, and depending on the location of the sun, they may squint. Have your subject keep their eyes closed until you’re ready to take the shot. That will ensure their eyes are wide open for the photo.
2. Backlight With the Sun
This is a difficult technique to pull off if you don’t use an additional light source, as strongly backlit images that aren’t carefully controlled tend to lose a lot of contrast, and the image will often appear washed out and flat. If you introduce an additional light source, however, or a method of modifying the light that hits your subject’s face, you can end up with lovely portraits even when your subject is standing in open sun.
Step one is to have your subject stand so that the sun is either over their shoulder slightly behind, as in the portraits below, or directly behind them. Try not to allow too much of the light straight into your lens. Then, you introduce one of the two modifications below.
Diffuser or Flag
A diffuser or flag of some kind, whether it’s a handheld diffusion panel or something as simple as a hat, held over the subject’s face to block direct light, can mitigate just enough of the sun to allow you to keep contrast while still giving your subject a bit of rim light. The trick is not to cover your subject with the diffuser entirely so that the sun still gives your subject a rim light. Additionally, a white diffuser, such as the 1 Stop Westcott 42-inch Illuminator used in the portrait below, will bring just enough light back into your subject’s face to maintain light shape.

Off-Camera Flash or Reflector
If you use the hard sunlight as a rim light source, and then use a reflector, flash, or strobe to mitigate (but not override) the sun, you’ll have much more control over the shape and quality of the light on your subject’s face. If you balance the light correctly (which is much easier with a flash or strobe than it is with a reflector), you’ll end up with images that have a diffuse glow like that of the cherished golden hour, but with more punch. If you really want your subjects to stand out, try to find a background that is a bit darker than your subjects. For the portrait below, I used a Canon Speedlight shot through a Westcott Rapid Box.
3. Use Gobos
This is a fun technique that can create very visually interesting portraits. All you have to do to work this technique is to find something that will cast a shadow, and position your subject so that the shadow falls across them in an interesting way. You can do this with anything from leaves and branches to hand rails, blinds, or building shadows. Pay attention to the general light shape on the subject’s face, but have fun with the shadow placement and remember that choosing where to place the shadows plays into the composition. In the image below, photographer Ella Grace Bell used hard window light to create a moody, dramatic portrait that plays heavily with shadows.

4. Feature the Environment
You can close your aperture a bit, shoot nice and wide, and get your subject engaged in their environment. In this case, the minutiae of the way the light is hitting their face is less important than it would be in a close-up image, because the subject of the photo is now not just the person, but the environment they’re in and how they’re relating to it. Because you won’t generally be singling out your subject via contrast, you’ll need to pay careful attention to composition and depth of field to keep your subject the focal point of the image. This is a great technique for shooting in outdoor locations where there is a beautiful view.
In the first image below, Pacific Northwest photographer Leesha King was able to use hard light to capture the feeling of being surrounded by the grandeur of the landscape.

For other great examples of the use of hard light to photograph people, you have no further to look that the fashion and advertising world. A great illustration is the punchy, high contrast editorial and advertising work of Mert and Marcus. Not all of us are shooting leggy glamazons, but the principles of working with hard light still apply and can be modified for any subject.
There are certainly times that working with hard, direct sunlight will require a bit of post-processing to mitigate the unwanted side effects of hard light, like enhanced skin texture, but with a bit of finesse and patience, you can get fantastic images straight out of camera.
No matter what light you choose to use for creating an image, the important part is to use the light purposefully and to understand how that light affects the subject and the mood of the finished image.


Nice tips.
Thank you Nicole!
Hi Nicole, good article, but the tips provided are all dependent on the context and the subject! At the start of the article you were referring to natural light photographers and wedding photographers and I suspect that the second bunch is the most commonest of professionals struggling with harsh light. However, your examples are all with fine looking models. I so wish you had included some examples from real weddings (not style shoots) to make your point better as that would have been useful for the aspiring professionals.
It makes such a difference when you have harsh shadows on the face of a not so model-like double chinned subject or for that matter, 10 of them in a group. This is when capturing the moment becomes of more importance rather than technical perfection. That is the reality of outdoor weddings and for many photographers, there isn't even the time to direct and pose to get the best use of light. This is where unexposing and postprocessing later plays a major part in many wedding photographer's professional life. Also, as one gets a bit more experienced and has the services of an assistant, life gets easier.
Hey Taz, thanks for the response!
Sure, most things photography related are dependent on context and subject, that's pretty natural, I think. You wouldn't necessarily shoot a boudoir session the same way you'd shoot a wedding, but you might be able to use light in much the same way, which is why I intended most of these tips to be workable no matter whom you're shooting.
One of the photographers who let me share an image, Leesha King, has begun using hard light during her weddings, which is why I used an image of hers in the set. And, of course, if every shape of hard light is un-flattering for your subject, you can still use tips 2,3, and 4 to take advantage of hard light.
Having photographed weddings in full sun at mid day, I agree, it is definitely a difficult subject to tackle!
I love hard light.... with experienced models, and on a modeling shoot. Never in a wedding. I'd only use harsh lighting conditions if I can align the shadows where I want to and not hope and prey for they align themselves on their own when time comes, in a wedding you find a moment to capture good light or not and yes, most of the images are not technically good but usually clients don't care. This is why I don't shoot weddings anymore, lack of quality control of the light, unless I became a wedding planner.
Nicole, this is a fantastic article! Easy to follow, with simple and straightforward instructions. Love it!
Thanks, Casey, I appreciate that!
Well written Nicole, very easy to follow. I really enjoy using natural light, sunlight, harsh light, if anything it gives me far more options and like you say, creating shadows etc can be really cool and I've got a few shots in my portfolio that I'm quite proud of. Wishing you every bit of success for the future!