
A photo is a two-dimensional rendering of a three-dimensional world. Although there is no longer any depth present, it is possible to add a sense of depth to it. I have gathered eight methods that can help you to add depth to your landscape photo.
We experience the world in three dimensions. There is height, width, and depth. By looking at the world with two eyes, separated by a few inches, we experience a little parallax between the two images that are registered by our eyes. The brain can translate these two images into one three-dimensional image. If you don’t have two images with parallax between the two, it is impossible to see depth.

There are cameras that can capture a true 3D image of the world, like this Fujifilm W3. Viewing these images are not that easy, and the quality is often very limited.
The Flat Image and the Illusion of Depth
Most cameras have only one lens, thus producing only one image. It is a flat rendering of the real world without any depth. But there are several ways to give the image a sense of depth. Although it is possible to use a few camera settings to create depth, most of these methods can only be achieved by using a good composition. I have gathered eight different ways that can help you to add depth to your image.
1. Depth of Field
This may not come to you as a surprise. The use of a small depth of field may be the most obvious choice when you want to create depth in your landscape photo. For that, you need to focus on the subject in your photo, and keep foreground and background elements out of focus.
A small depth of field give a 3D feel to an image. It works best with longer focal lengths.
A small depth of field is easy to achieve with a longer focal length. Since many landscape photographers often prefer an ultra-wide angle lens, this will be more difficult. Getting close to your subject will help, but only up to a certain amount. For the landscape photographer with an ultra-wide-angle lens, the second method may be a good alternative.
2. Use a Foreground Element
Search for an interesting foreground element in your landscape. Get your wide-angle lens, and get as close as possible. The relatively large foreground element, together with a smaller landscape in the back, will provide a strong sense of depth.

Using foreground elements in the frame gives a sense of depth when using an ultra-wide angle lens.
A foreground element can work against you if it is not interesting enough. Uninteresting things in the foreground can block your view, especially when there is no clear connection between foreground and background. Always keep this in mind when choosing a foreground element.
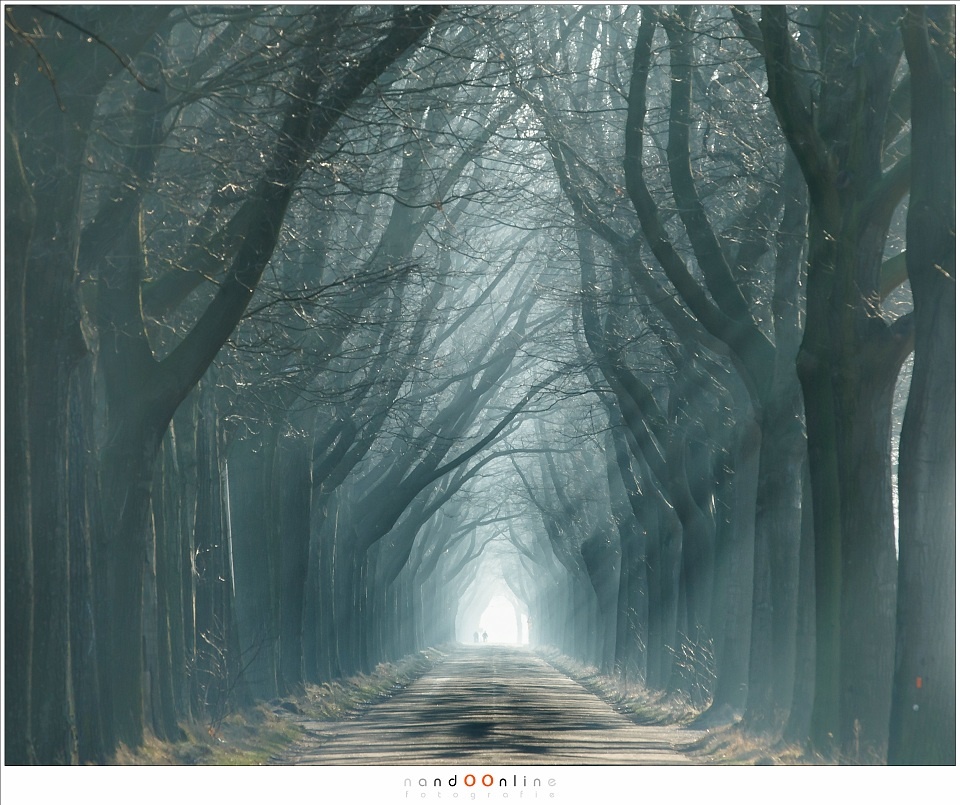
3. Use Diagonal Lines
Having a foreground element in your image might not be enough to give a sense of depth. There has to be some sort of connection between foreground and background that will guide your view. By adding diagonal lines in an image, your eyes will be pulled inwards, as if the image has a third dimension.

DIagonal lines will guide your eyes into the picture.
Diagonal lines work very well, but also s-curves, triangles, and other compositional lines can help to give a sense of depth. Just be careful not to block that inward view with other elements or lines. Any obstruction will work against creating a feeling of depth.
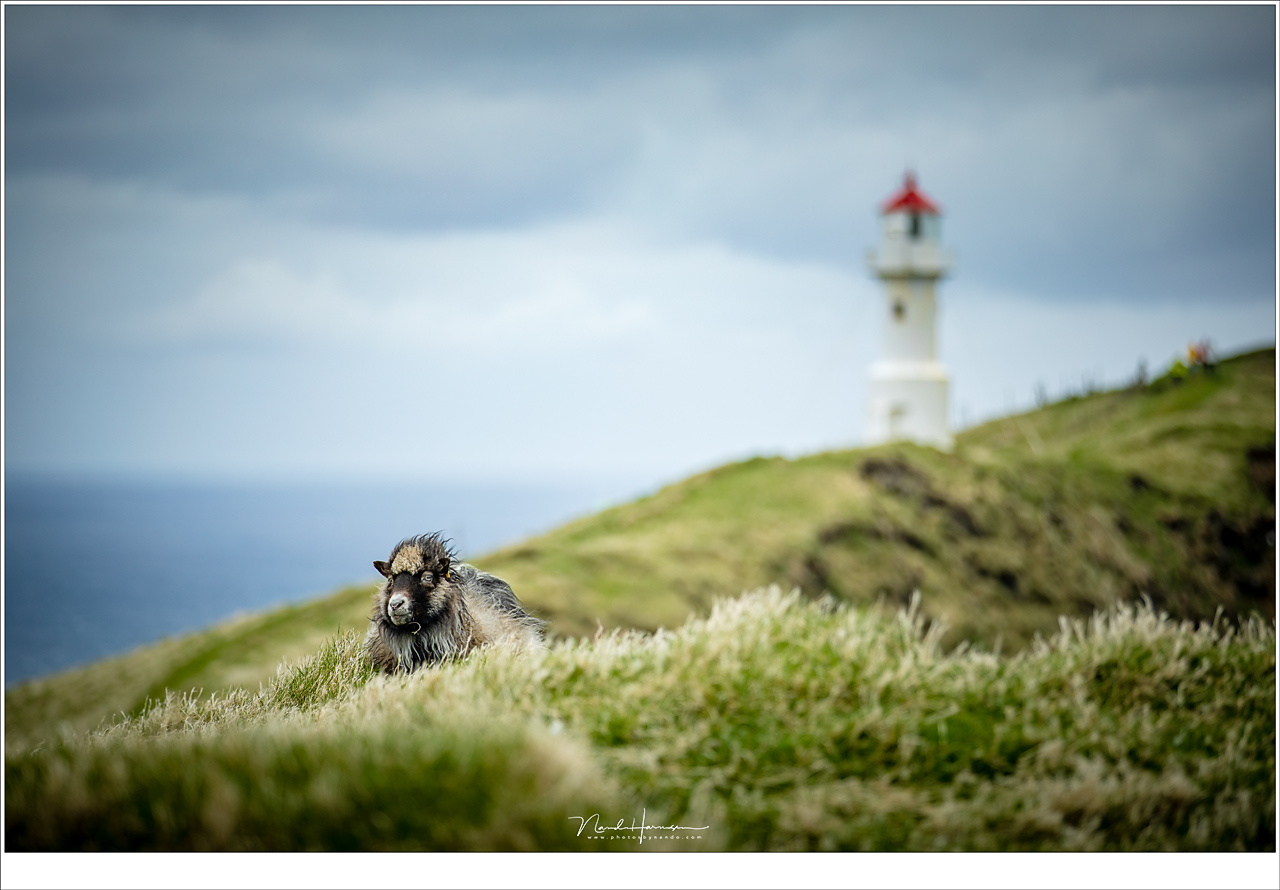
4. Add a Human Element
Landscapes are often without dimension. In other words, it is nearly impossible to see if a rock or tree is big or small without something to compare. Often, human elements can give a feeling of dimension. A person next to the rock or tree shows how large it is or how small.
When a human element is placed in a well-thought location, the landscape can get a sense of depth. Make sure this human element blends well into the landscape, or it won’t work as well.

To get an idea of scale, a human element can help. It also gives a sense of depth.
5. Use Weather Elements
The weather can also help with the illusion of depth. A little bit of fog will make distance elements more diffuse, resembling the use of a small depth of field by adding a natural blur to it. Fog can also help dividing distance elements like hills and mountains in a very pleasing way.

Fog will make distance objects blurry without the need of a small depth of field. This gives a nice 3D effect.
Fog and mist are the obvious weather elements to use. But rain or snow showers can work as well. Snow can give a strong sense of depth if you manage to capture falling snowflakes in the front.
6. Play With Colors and Light
Colors can help to add depth to your image, although this may need a bit of help from post-processing on some occasions. Imagine photographing a landscape during the blue hour, when the world is painted in a natural bluish hue. If you change some foreground elements with a corrected white balance, it will help show depth in an image.

Colors can be used for a 3D effect. Believe it or not, this foreground color is not altered in post-processing.
Often, you need some kind of layers in an image to use this technique in the best possible way, and some of you might think of this as too much photo manipulation. If this is the case, you might prefer looking at the game of light and shadow, when the sky is half cloudy. On those occasions, the sun is illuminating strips of the landscape. There, you might find natural color differences that add depth to your landscape.
7. Perspective
Perspective is another obvious method to give a sense of depth. It works very well with repeating elements in the landscape. These elements will appear large in the foreground and become smaller towards the distance. This will add a strong three-dimensional feel to the image.
Repeating elements will help you to give the image a 3D feel.
8. Combine the Previous Methods
These seven methods can often be combined. As a matter of fact, I think you will almost always use more than one method in the same image. A foreground element will work perfectly with a small depth of field. It will also work with colors and perspective. By combining multiple methods, the sense of depth can be increased, giving your image a very strong three-dimensional feeling. On the other hand, it is not necessary to combine multiple methods.

Don't limit yourself to one method. I have used weather elements, colors in post-processing, and a forground element to give a sense of depth.
Try To Look in Two Dimensions
It might be difficult to see depth if you are shooting landscapes. After all, you are standing in that beautiful three-dimensional landscape while looking at it with two eyes. The best way is to look at the landscape in two dimensions, which helps to achieve a strong composition and a nice sense of depth in a flat image
There are a few methods that can help you to see the world in two dimensions. Try closing one eye, thus losing the ability to see in three dimensions. Combine this method with making a frame with your thumbs and fingers.

Try to look at an image in 2D to see if the composition works. This will also help you to achieve a 3D effect in a two-dimensional image.
Another way is to look at the screen on the back of your camera. The image on this screen is the landscape in two dimensions, just like it will turn out on the computer or in print. Whatever method you are using, as long as you can see the landscape in two dimensions, it will work.
If you have another tool for adding depth to a landscape photo, please share it in the comments below.


This was a good read
This is the type of articles a site like Fstoppers should publish. Not the click-bait nonsense their page is full of.
Lots of useful tips here, thanks!
Thank you Nando - this is a great reminder of how to "separate" different elements of the composition in our photographs in a world that seems obsessed with only one technique, wide aperture "bokeh".
Can I add a ninth way that you have illustrated so well in your 3rd image - that of movement? For landscapes we can use neutral density filters and long exposures to blur clouds, water, even moving foliage. For city landscapes we can create a tide of people or cars to wash through our composition. Other times, with a moving subject, we can use panning to create the separation between subject and background.
Then two variations of your theme. First a variation on step 1 - depth of field; for by composing to put our out-of-focus background as bright, highlight areas we can use lens artefacts to our advantage. Owners of the "infamous" Helios 44 lenses all swear that their background highlights "bloom" and "swirl" to create a clear artistic demarcation between subjects and backgrounds to further emphasise depth. In truth all lenses can do this to one extent or another - but often the least corrected lens designs maximise this effect. Check out the "Lomography" photographers group to see more of this.
The second variation is for step 8 - light and colour. One great way to create depth and separation in a landscape is to use the time of day to our advantage to throw shadows across or into our composition. A flat landscape at noon can become broken up into different elements by waiting just a few hours. Matisse knew this very well - painting the same landscape using a different canvas every hour of the day. Photographers can learn a lot from the impressionist landscape painters - so there's another bonus for such a creative profession or hobby!
Please Nando, and F-stoppers, can we have some more thoughtful (and thought provoking) pieces like this!
Best wishes - Paul C
Thank you, Paul. Great suggestions. Love to give it a try myself :)
Thank you Nando! I always enjoy learning from your articles!
Keep 'em coming!
I'll try. THanks
Mind blowing photos as usually, Nando. Thanks for posting. FS definitely need more real educational articles like this one.
Thanks Tammie
Superb narration, and great learning for amateur photographers like me. THANK YOU!!!!
Excellent information well presented. I appreciate that it is text/images rather than a 30 minute video.
Thanks Jerry.
btw - I hear that a lot, about the video part.
Thank you. Great article. However, I'm not sure what you mean by diagonal lines??
Elements in the frame that are placed in a diagonal line. Or true lines that run diagonally through the frame.